01 / Reproduce
Build a sideways fixture
Download the practice ZIP and extract it to a fresh folder. Open PowerShell there. With Python 3.10 or newer installed, run:
python -m venv .venv
.\.venv\Scripts\python.exe -m pip install Pillow==13.0.0
.\.venv\Scripts\python.exe .\check-orientation.py
Installation downloads Pillow. After that, the exercise runs locally without an account or API key. It creates lab-output and refuses to replace an existing directory. It generates its own small inputs; it never opens your photo library. Our observed output was:
Python 3.13.15 / Pillow 13.0.0
EXIF 6: stored 360x240 -> normalized 240x360
Previews: raw [180, 120] -> ready [120, 180]
PASS: 8 orientation fixtures + repeat, no-tag, source and saved-preview checks
Open lab-output/raw-preview.png and lab-output/ready-preview.png side by side. These are the actual previews from our run, saved as fresh RGB images without inherited metadata so a viewer cannot silently orient the raw example:
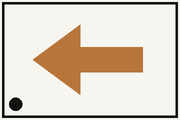

The source file orientation-6.png still contains the display instruction, so an EXIF-aware viewer may show it upright. That is why this comparison uses separate metadata-free previews. The script also writes the versions and measured dimensions to report.json.
02 / Inspect
Inspect the orientation step
Pillow's ImageOps.exif_transpose applies the EXIF orientation transform and removes applied orientation data. By default it returns a new image. If no transform is needed, it returns a copy. The lab's EXIF-6 case needs a clockwise quarter turn; several other values involve mirroring, so “rotate every image 90 degrees” is not a replacement.
After running the lab, this complete excerpt shows the order. Open a Python session with .\.venv\Scripts\python.exe and paste:
from PIL import Image, ImageOps
with Image.open("lab-output/orientation-6.png") as image:
    ready = ImageOps.exif_transpose(image)
    ready.thumbnail((180, 180), Image.Resampling.LANCZOS)
    print(image.size, ready.size, ready.getexif().get(274))
Enter a blank line after the indented block in an interactive session. Our output was (360, 240) (120, 180) None. The source dimensions remain unchanged. The new image is upright, fits the requested box, and no longer carries tag 274, the Orientation field.
thumbnail modifies its image in place while preserving aspect ratio. Decide orientation before calculating a portrait crop or passing pixel coordinates onward. This exercise tests normalization and thumbnails; it does not implement or assess a cropping algorithm.
03 / Make it your own
Make a smaller handoff
Repeat with a 96-pixel bounding box in a new directory:
.\.venv\Scripts\python.exe .\check-orientation.py --edge 96 --output adapted-outputOur run produced raw dimensions [96, 64] and ready dimensions [64, 96]; the same checks passed. Compare both reports. The requested size changed, while the orientation decision stayed the same.
For a project of your own, add a visible asymmetric marker to a test card and inspect the exact image sent across the next boundary. Record the input hash, tag, and before/after dimensions. Keep the original file and write a separate derivative. Verify your own application's display and upload behavior; this lab does not establish what a particular vision provider does with metadata.
04 / Boundaries
Keep the evidence in scope
The script authors all eight tagged fixtures from one reference card using inverse transforms. Each normalized lossless image must match the reference dimensions and RGB bytes exactly. It also checks repeat normalization, unchanged source hashes, a missing-tag copy, and the saved preview's geometry and absent orientation tag.
This is a controlled check of the authored PNG fixtures. We did not test actual phone photos, JPEG round trips, corrupt files, animation, color management, OCR, model outputs, performance, or crop quality. Orientation correction is not metadata sanitization and does not prove a model understands the picture.
Optional AI review prompt, not run: “Review this fictional image preprocessing function. Identify where orientation is applied, which image is resized, and whether the original is changed. Suggest a test with an asymmetric marker. Separate preprocessing checks from claims about a vision model.”
05 / Primary sources
Read the Pillow references
- Pillow concepts: orientation — image orientation metadata and applying it.
- ImageOps.exif_transpose — transformations, orientation-data removal, and return behavior.
- Image.thumbnail — an aspect-preserving, in-place operation.
- Pillow 13.0.0 on PyPI — the release installed for this exercise.
Sources checked November 21, 2026. The downloadable lab pins the version we ran; the stable documentation may later describe a newer release.
06 / Keep it handy
Get the practice and posting files
The practice ZIP contains the script and README. It generates the fixtures and previews when run. The posting ZIP contains the original portrait, teaser caption, alt text, and full article URL. Social content is prepared for manual posting; it has not been scheduled or published.
Browse more AI Anonymous field notes or talk with JABSystems about your workflow.